25 December, 2009

commandPort problems with Maya 2009 and vista

Some time ago my jEdit MayaEditor plug-in (which sends commands to maya) stopped working and it was really annoying because I had to source my script manually each time after modification! After so many frustrating efforts and a long time I found that all the macros and plugins could not connect to Maya because connection was being refused. So the problem must be with maya's commandPort command or its compatibility with Vista. Then I googled the problem and voila I found the solution from here(Area-forums). Internet is amazing, it makes any kind of knowledge reachable!!!

Now my jEdit is working with Maya and Eclipse is working with Maya too. Awesome!!! Can't wait to start coding my auto rigger.

Solution:
commandPort -eo -n "127.0.0.1:7890";
commandPort -eo -n ":7890";

15 October, 2009

Face setup: Blendshape vs Joint

I advocate both methods and I want to utilize both of these methods to get the desired results. Here are few notes from my current Face Setup research I am doing.

Blendshape:
-> One main problem I have with blendshape besides them being liner is that if not modeled correctly it is difficult to show skin sliding and fleshy feeling of the surrounding skin area of the muscle that moves. For example, while modeling cheek bulge for the smile seprately we can just pull the vertices around cheek bone to create the bulge. But, it will look like a baloon effect. Instead, cheek bulge is the result of skin being pushed towards the zygomatic arch bone. And we have to have that skin pushing and bulging to feel the expression correctly.

So what to do?
I think that one primary requirement is the proper work flow for creating indiviudal muscle shapes. And we need a system that defines how these individual shapes interact in order to produce more beliavable skin expressions. Weta used such system for Golumn which had hundreds of blend shapes (many of them were corrective shapes).

Joints:
-> It's main weakness is the lack of intuitiveness in building proper face shapes. And many times it is even almost impossible to get the shape we need just with joints in reasonable amount of time.

So?
Face topology becomes more crucial to get proper face shapes when working with joint based setup. We also need a really good system that allows the joints to be manipulated in a way that simulates muscle interactions and creates desired face shapes.

For highly cartoony characters that brake the rules of muscle interaction is a different situation.

I have been doing a lot of research for Facial Rigging and I am studying different kinds of systems to define muscle interactions. Mainly I am looking for freedom and flexibility (to extend or retarget) in such system. I think my face setup theory I came up with few months ago still has potential. Right now, I am trying to modify it and add more to it to make it a more generic face system.

18 July, 2009

Rig : Feature Notes

While animating I realized that following behaviors are more desirable.

-> Clavicle should not affect arms, in FK or IK. (But, still have an option for arm to follow clavicle)
-> Knee should be able to move independently from the foot.
-> Neck should have an option for following spine or align with world space. By default it should follow the spine, as overlapping action is easier (for my workflow).

-> Almost all major parts should have an option to turn orientation inheritance on and off.

Rig : Testing & Bugs

I have been animating this quarter and I have realized that true problems with any rig behavior can be identified only after animating it for at least one animation. If you use the rig for say 1 or 2 weeks you become comfortable with new features and you also find bugs or problematic behaviors.

It is mostly like software engineering. Rigs should always go through QA (quality assurance) testing. Because sometimes some bugs can only be found after some time (depends on a lot of factors). Sometimes while animating not all features are used or the right combination of triggers are not activated to produce the bug.

It is sometimes not the individual logic that is flawed, but the combination of logics that create the problem. Hence any logical implementation, a rig or a script, should be tested for all possible combinations.

25 June, 2009

Finally, my own website!

I feel very excited to have my own website. I am still in the process of updating the pages with more detail and better layout. But mainly I have my demo reel up!

I want to say thank you to my lovely wife :)

http://maulik13.com

04 June, 2009

Facial Rigging Notes

I have been studying the face anatomy and looking at different reference videos to see how the different areas in the face deform. My main interest is in looking for a particular relationship between different muscles. There are two main types of research for facial rig.

1. Follow anatomically correct deformation. This also includes exaggerated emotions that are based on realistic deformations. This generally falls into visual effects work.

2. The other is to study the given drawings and concepts of stylized character designs and see what deformations are needed. Most of such deformations are not close to how realistic deformations would look like. What is more important in this case is to study how deformations create the shadow lines to give the results we need. Generally this is more cartoony type of deformation hence more free form deformations. But it is still important in looking for how different parts interact.

I think it is really important to have fluidity in the facial deformation. This gives life to the face. I believe interaction of different face parts generates this fluidity in the face. So in either case what is important is to not just create individual deformations, but have a system that creates interaction between different parts. More later.

26 May, 2009

Making a local orient constraint

In my research project, at one stage I needed an orient constraint that works locally, i.e. it works only on the hierarchy below a particular transform. I believe we could do that by re-connecting orient constraint's targetMatrix. However, since I don't know how orient constraint works under the hood and it does not allow me to have dynamic offset, I had to come up with my own constraint using matrix calculations.

So I have been digging into how transforms work and how to visualize the matrix concatenation. I was successful at making such constraint. However, I am still working on adding an offset that can dynamically be changed without affecting the rotation of the controlled object. I have yet to use this on my research project (fingers crossed). But, knowing I had success with a sample hierarchy gives me hope.

Follow this thread for detailed discussion on this orient constraint. LINK

edit: (26.06.09)
Later in my research I realized that what I had found out was not the best solution for what I was doing.

Continue on Twist

The best way to understand twist is to think of the joint as a vector and twist is a spin around that vector. This leads to the topic of how quaternion transform works. More on that later.

When it comes to vector related implementation two tools mentioned below are a great help.

-> Single IK chain with pole vector can act as a vector. And spin is defined by pole vector or twist attribute.
-> Aim constraint comes very handy when vectors are involved. You can use aim vector and up vector to control the rotation of an object.

Keep in mind though that they do flip at one point or the other. The pose does not change generally, but if you are doing calculations based on their rotation then you are highly prone to flipping issues.

09 May, 2009

Twist Setup Notes

When doing a twist setup to distribute the rotation uniformly there are some important things to consider. Following are some notes from my experience while working on forearm and shoulder twist setups.

-> Twist cannot be associated with any single axis. Due to the nature of Euler angle, based on your rotation order axis that twist the joint could change.
For example,
A shoulder joint with zxy rotation order in rest position will twist around x-axis. But if you bring shoulders in front by rotating on y axis, now the z-axis is responsible for twist.

Hence, we cannot plug one axis from shoulder joint to the twist joints. Of course we can plug all three axis and it may work, but that's really not the elegant solution. Inspired by this tutorial, I think Aim constraint is the most elegant solution so far.


->Another issue is the source of twist and in which direction its propagating. For example, for forearm twist, rotation originates from the wrist joint and propagates towards the elbow joint. So the direction is from a child joint to its parent joint. However, in shoulder twist the direction is opposite, twist propagates from parent to the child joint. This changes the equation of how to make twist joints inherit motion from shoulder joint and dampen the rotation at the same time.

06 May, 2009

Scale Constraint on Joints

It does not work properly. As I had posted earlier, joints use a special scale connection with inverseScale attribute (only joints have this tranform property) when you create a chain hierarchy. This gives a special behavior when scaling a parent joint. And using scale constraint messes up this inverseScale calculation in joint transform and so the child joints scale weirdly when scaling the parent joint.

So use connection and a blend node(blendColors) on a joint chain to blend between scale values.

edit:
From reading on forums I get that the problem is with constraints not taking "segment scale compensation" into consideration. So orient constraint suffers from the same problem. I had encountered this problem when working on a stretchy setup on arms.

29 April, 2009

BlendShapes 1

If somehow (or by doing something stupid like I did) if you have blendshapes created which don't have the same vertex order as your base geometry or if geometry changes in the base model, don't panic! You can use already created blendshapes to make new ones. Use a wrap deformer to do this as explained below.

-> Take all old blendshape geometry and add them to old base geometry using "Blend Shape" deformer.
-> Align new geometry poition to match with the old base geometry (which has blendshapes).
-> Apply a wrap deformer so the old base geometry drives the new base geometry.
-> Now dial in each blendshape individually (you just need to do it for one side, left or right). This will deform the new geometry as the old base geometry deforms.
-> Duplicate your new deformed geometry. You have got a blendshape for new geometry!

You can adjust the options in wrap deformer to get the best results. And when you dial blendshapes make sure you don't get any undesired deformations. You can actually paint blendshape weight to remvoe it later if you have any extra vertices being affected.

20 April, 2009

Direction connection for rotation

From my experience so far, connecting rotation values directly is not a good practice. There are some pre-conditions that have to match in order for this to work. So you end up loosing quite a bit of flexibility and you have to make 110% sure that those conditions would not change after you make connections. Here are some main conditions that I learned.

1. Rotation orders have to be the exact same.

2. If local rotation axis between parent and child (relationship considering how connections are made) do not align all the time this will not work properly. So rotating parent will rotate child differently.

So if you still need to use the connections and solve at least the 2nd problem, then you need to create a node network that will find the offset between local rotation axis of both objects and then assign rotation value to the child object accordingly.

19 April, 2009

FK controllers - not as simple as I had thought

FK controllers are trickier than they seem to be. They are not simple! Here are some questions and thoughts I encountered while doing an arm setup.

1. How to bind controllers to the joints: Parent shapes? Constraint? Connections? Or combination of all these?
2. Constraint works, but you cannot take advantage of joint's inveseScale attribute directly. Connections have more issues, and it starts getting complicated when you parent stuff. Because the values don't update in channel if you have connected transform values directly using translate and rotate. More complicated connections can be established using worldMatrix and parentInverseMatrix to get proper world space transform value, but it just ends up being more complicated than it has to be. Unless I have a simple node that does this, which is what parentConstraint is.
3. Now this leaves us to parent shape method. It seems that this technique works the best amongst other techniques. The main advantage is that when scaling all child controllers follow with their respective joints. Here are the problems with parent shape method.
  • You cannot use translation values because joints will have some values already in there.
  • If you change rotation order of the controller you are changing the rotation order of the joint itself. This can cause the problem if you are blending between joint chains and you have not used constraints.
  • The main problem is that by parenting a shape you are directly manipulating the joint, which I think is not a good idea.
  • Scaling joints will also scale shapes (This could be good or bad).
So my conclusion is that the best way to make FK controls work with blending and scaling is to use parent constraints, parenting of controls and connections for scaling. I will post this in more detail later.

18 April, 2009

True on the fly Rotation Order Change

True on the fly rotation order change means that the object should not jump from its current pose. I started looking into matrix to achieve this. Basically, I thought if I can formulate the equation that involves rotation values and rotation order I can solve that equation to get the rotation values that will keep the object in the same pose. I found that I could actually have separate matrices for each axis, RX, RY and RZ and then multiply them one by one based on rotation order to get this rotation value. However, in trying to find if I can set matrix value of an object using MEL I ended up finding a solution of my actual problem. It can't get simpler than this.

xform -preserve true -rotateOrder yxz; 

Select your object, rotate in any position and then change rotation order using this command. Object will stay in the same pose! Thanks to "-preserve" flag.

17 April, 2009

"Easy Select" or "Proxy Select"

In the latest rigging project I have been working on this idea to make selection of controllers quick and easy. Generally the problem with curve controllers is that you cannot select them quickly because you have to be accurate in clicking the thin curves (unless you are an avid shooting game player and you have very high accuracy). In my experience sometimes it becomes a little annoying when it takes 3 clicks to select a controller.

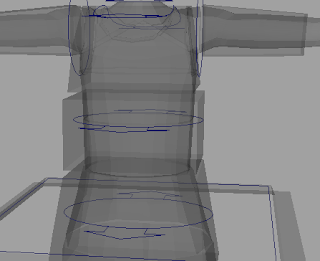
So in this idea of "Easy Select" or "Proxy Select", I have hidden geometry that defines the selection area around a curve. Each controller has its own selection area defined this way. So instead of pin pointing on the curve you can click anywhere in this 3D area to select the curve controller. And a controller can have more than one objects defining its area, clicking on either of them will transfer selection to that controller.

I created a script to do this, so I click selection area geometry first and then select the target controller and click shelf button and I have "Easy Select" working for that controller. I also have an attribute on target controller so that I can turn this on and off. The big problem with this technique was that undo was creating this cycle where if I undo it goes back selecting proxy geometry and my scrip transfers that selection back to the control. And if I do undo again the same thing repeats. Hence I can't do any undo before "Easy Select" event. For the solution, I had to disable undo before I execute the function and turn it on at the end.

Different geo. that defines selection area for controllers.
I am still working on this script to make UI to list all "Easy Select" objects and their selection area objects. Also, I need to add a function to delete the nodes & attributes that I am creating so if you want to delete this feature from the scene you don't have to do it manually.

Connecting Geo Display Type

Generally you can link geometry display type by adding them to a layer and switch between "template", "reference" or "normal". Alternatively you can change its display override type to reference directly in the attribute editor. In later case it become difficult to debug, if you have to go back and find that geometry and change display type to "normal".

I find it more organized if I have an attribute in the main controller (hidden from animators) that I can use to change the display type of all geometry. This way I can go back and select geometry easily by dialing the number for respective display type. Also if we expose less non-animation related things to animators its safer for the rig and cleaner for animators.

09 April, 2009

Default Joint Connections

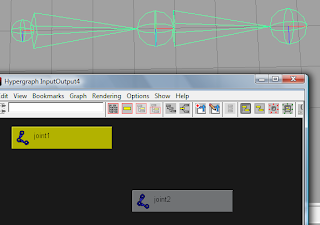
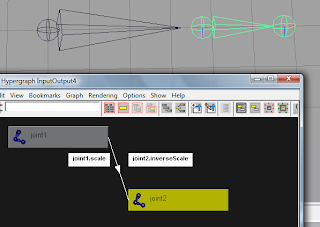
I have been using Hypergraph a lot lately. Today I found out that when you create a skeleton hierarchy, joints have scale->inverseScale connection by default. So when you scale the joints the children joints do not scale, they just move. But if you delete the scale connection joints follow the normal parent scale transform. Here are the screenshots. Simple, but useful.


Edit: I forgot to mention, "inverseScale" attribute is available only with joint transform.

putenv command on Vista

I am not sure if its vista (you bug me a lot sometimes) or Maya but when I use putenv command to create a custom environment variale it does not save the value. After I set the environment variable and then use "getenv" to read the value it works. But when I restart maya the variable is gone! It's set back to null. This is really annoying.

edit:
It looks like windows does not remember the environment variable itself. So if I use SET command to create a new environment variable then restart command prompt the variable is gone. Does this mean it's limited only for current tsession in vista? I believe when I used this script on XP it did not give me this problem.
I am going to try using Maya.env now.

06 April, 2009

A trick to increment a string in Maya

I was developing a script to increment version & save the current file where the script checks for version tag (*_v1.ma) and then increments it. I took a long path first where I extract the version tag then extract the number and increment it. And ofcourse Maya will give you a warning when it converts string to integer. So to solve that working I was wondering what to do and it clicked to me that maya can increment it for me. And it's simple!

You need to have the sub string where the numerical part is at the end
e.g. modlObj_artist_v1

Here is the sctipt.

string $curName = "modlObj_artist_v1";
// we will create nodes under this node so that we know they are unique
string $parent = `createNode transform`;
createNode -name $curName -parent $parent transform;
// create it again so maya renames it with incremental suffix
$newName = `createNode -name $curName -parent $parent transform`;
// delete
delete $parent;
print $newName;

Though in my case I still need to extract version tag in order to check if its present.

18 March, 2009

IK vs FK part 1

I have been studying the nature of IK and FK chains to study which one does better at what kind of movement in animation. Here are few simple observations that I wanted to note down.

FK Advantages:
  1. The greatest advantage I see with FK is ease in achieving overlapping action, e.g. between upper arm and forearm.
  2. Natural Arcs while interpolating between keys.
  3. When elbow is planted or when we just need to move forearm then FK is easier.

IK Advantages:
  1. The best thing about IK is the simplicity it offers in creating a pose. For example, positioning a hand with IK is very intuitive and predictable.
    (With FK, I believe the problem is that you have to think in terms of two rotation transforms to make hand reach a goal position. Also, Euler rotation introduces a certain level of difficulty if axes are not in proper alignment, i.e. two axes are closer to each other.)
  2. Animators have to deal less with Euler rotations, hence less Gimbal lock problems.

I understand that many times FK or IK is a personal preference. So a particular behavior of FK/IK may be difficult for one person, but easier for another. But my goal here is to list mainly logical advantages of each system.

17 March, 2009

Dedicated to "Hello world!"

Any programming language learning is incomplete without a nice "Hello world!" program. It is a different kind of joy when you start learning programming and see this program for the first time. And hence I am dedicating my first post to this program, "Hello world!".

I want to use this blog as my notepad to share ideas on rigging and any kind of technology related with character animation and art. I love to do character animation, but I feel that there is a huge scope for improvement in digital animation tools. One of my main areas of interest is the interactive nature of digital puppets. I want to improve this interaction to bring the most intuitive experience for animators (including me) to create art. And lately I have been falling in love all over again with mathematics. I find Math to be artistic in some ways because you can represent a lot of phenomena in life by mathematical notations. It's an arguable concept, but that's why I am saying I find it art only to an extent.